Tutorial 1: Setting up the haptic environment for coding
Welcome to Tutorial 1: Setting up the haptic environment for coding. If you are familiar with these steps, please continue on to another tutorial. It is always possible to jump back to pick up things missed in earlier tutorials.
All
tutorials are designed as Win32 applications unless specified otherwise, and
all code is written in Visual C++ 6.0.
If you are using another development environment, this will not be of
much help to you. If you have a link to
a page providing this information for other development environments email it
to me and I will post it under the tutorials.
This tutorial is identical to the information provided in the back of
the GHOST SDK 3.1 Programmer’s Guide: appendix A. All copyright privileges are preserved for SensAble Technologies.
1) First things first, we must open up a new Win32 application
file in Visual C++. So, launch Visual
C++ and select File > New. Make sure you are
in the Projects Tab of the dialog box that opens up, and select Win32 application. Enter a name for the project under Project Name and a
directory for it to be saved to under Location. Click Ok. In the next dialog box, make sure An Empty Project is selected,
and press Finish. A message box
will open up confirming that the appropriate files have been created. Click Ok, and we are ready to set up the
appropriate links for coding!

2) Now
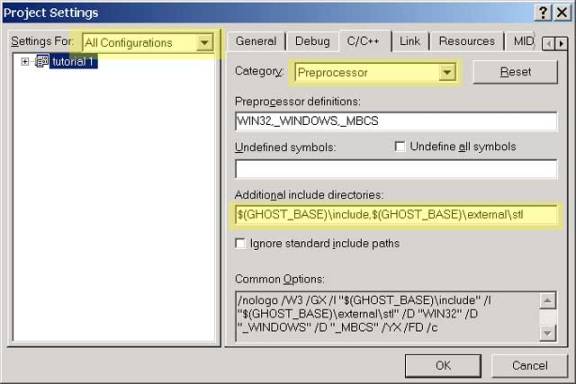
that we are ready to make our links we will begin by selecting Project > Settings.
·Under Settings, select the C/C++ tab.
·Under the Category drop down menu select Preprocessor.
·In the Settings for drop down menu, select All
Configurations.
·In
the Additional Include Directories field, add: $(GHOST_BASE)\include,$(GHOST_BASE)\external\stl
Ok,
the first part is done. Now on to the
next part!
3)
This
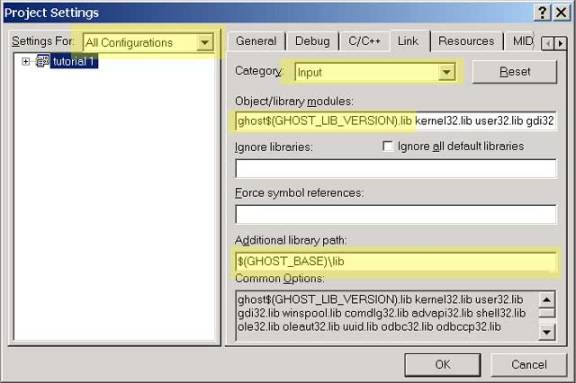
part adds the correct library paths to Visual C++, so select Project > Settings again.
·Under
Settings,
select the Link tab.
·In
the Settings for drop down menu, select All
Configurations.
·In
the Category
drop down menu, select Input.
·In
the Additional Library Path field, add: $(GHOST_BASE)\lib
·In
the Object/Library Modules field enter: ghost$(GHOST_LIB_VERSION).lib
The second part is now done. We are now ready for the last part!
4)
Here we need to link to the
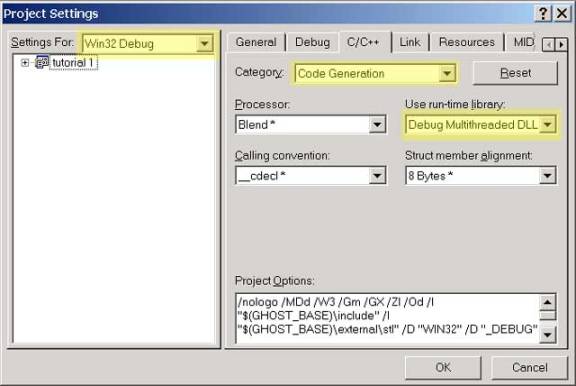
appropriate .dll files, so once again select Project
> Settings.
·Under
Settings,
select the C/C++ tab.
·In
the Category
drop down menu, select Code Generation.
·In
the Settings For drop down menu, select Debug.
·In
the Use Run-Time Library drop down menu, select Debug
Multithreaded DLL.
·In
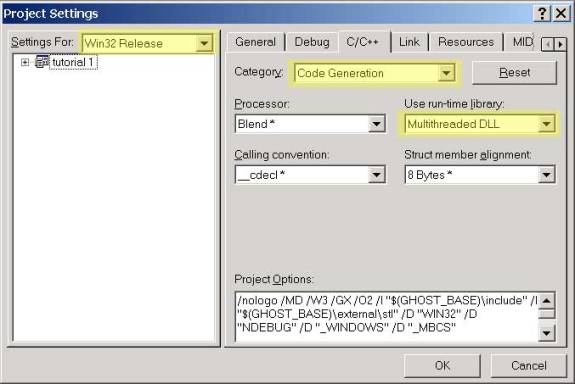
the Settings For drop down menu, select Release.
·In
the Use Run-Time Library drop down menu, select Multithreaded
DLL.
All done! We are all set to start coding. Please note that you may wish to do this
again for a console application. Follow
the same steps and save a backup copy for future use. Console applications are nice to begin with because of the simple
text interface for feedback.
Please e-mail me with any
comments or questions related to this, or any other tutorials on the GHOST SDK.